
- Side lap: One rib overlap minimum for corrugated panels; interlocking seams for standing seam
- End lap: 6-12 inches typical, more for low-slope roofs (always overlapping downslope direction)
- Critical requirement: Continuous butyl tape sealant between overlapping surfaces
- Low-slope roofs: Require longer overlaps and enhanced sealing due to slower water drainage
- High-wind areas: Need closer fastener spacing and strategic panel layout
- Most common leak cause: Insufficient overlap distance, missing sealant, or poor fastener placement
- Proper panel overlap helps a metal roof shed water the right way and protects the roof deck from moisture damage.
- Side lap and end lap are not the same, and each one needs the right sealant, fasteners, and placement.
- Low slope roofs usually need more overlap because water moves more slowly across the surface.
- Missing sealant, poor screw placement, and short overlap distances are some of the most common reasons metal roofs leak.
- Small overlap problems can sometimes be repaired, but major installation mistakes often require panel removal and reinstallation.
- Good materials, careful layout, and correct fastening make a big difference in how long a metal roof lasts. A professional inspection can identify overlap issues early.
Introduction
Metal roofing is known for strength, long life, and strong weather protection. The Metal Roofing Alliance notes that quality metal roofing is built for long-term protection and performance, and it can last 40 to 70 plus years, even in extreme conditions. But those benefits only show up when the roof is installed the right way. One of the biggest details in the whole system is panel overlap. When the overlap is correct, water moves off the roof as intended. When it is wrong, even a high-quality metal roof can end up leaking far sooner than expected.
Many homeowners focus on panel type, color, and price, but overlap is one of the real performance details that decides whether the roof stays dry for decades. Installation quality also plays a major role in long-term longevity and performance, which is why details like seam placement, fastening, and overlap should never be treated as minor parts of the job. If you want to understand how metal roofing panels should overlap, what causes leaks at the seams, and what to do when something goes wrong, keep reading.
Understanding Metal Roofing Overlap Fundamentals
Metal roofing overlap is the connection point between one panel and the next. It sounds simple, but it plays a major role in how the whole roof works. A metal roof is not just a group of panels laid side by side. It is a water shedding system, and the overlap is what helps that system function properly.
What is Metal Roofing Overlap and Why It Matters

Metal roofing overlap is the area where one metal panel covers part of another panel. This helps create a continuous surface across the roof. The goal is simple: keep water moving outward instead of allowing it to slip under the metal.
This matters because a roof does not fail only from dramatic storm damage. It can also fail from repeated small mistakes. A slight opening in the seam, a missing line of sealant, or a poorly placed screw can let in moisture little by little. Over time, that can lead to rust, stained ceilings, damaged decking, mold concerns, and expensive repairs. Regular roof inspections can catch these issues early.
The Science of Capillary Action: Why Overlaps Leak

Capillary action is one of the main reasons water gets into bad metal roof seams. In simple terms, water can move through tight spaces between two surfaces even when gravity should pull it down. That means water does not always need a big hole to get in. A narrow seam can be enough if the conditions are right.
This is why overlap design matters so much. The right overlap distance, correct panel position, and continuous sealant help block that path. Without those protections, wind-driven rain can push water into the seam, and capillary action can carry it farther under the panel than most homeowners expect.
Types of Metal Roofing and Their Specific Overlap Requirements

Not every metal roof overlaps the same way. The style of panel changes how the seams are formed and how much protection the overlap provides. Some systems are designed with raised seams and concealed fasteners, while others rely on exposed screws and visible ribs.
Standing Seam Metal Roofing Overlap Techniques
Standing seam metal roofing uses raised vertical seams that lock panels together. These systems are popular because they look clean and generally do a strong job of shedding water. Since the seams sit above much of the water flow path, they offer better protection than many exposed fastener systems when installed properly.
The side connection in standing seam roofing usually locks together mechanically or with a snap system. End laps still need careful attention when a full panel length is not possible. These joints should be sealed properly and placed where the roof has strong support underneath. Even a premium standing seam roof can leak if the end lap work is rushed or poorly detailed.
Corrugated and Exposed Fastener Panel Overlap Standards
Corrugated metal and exposed fastener panels often overlap by one rib or more depending on the product and site conditions. These roofs are common on homes, barns, sheds, workshops, and some commercial structures. They can perform well, but the visible fasteners and simpler seam design mean careful installation is essential.
Because these systems depend heavily on proper screw placement and seam sealing, small errors can show up faster. If screws are too loose, too tight, or poorly aligned, the overlap area can become vulnerable. These panels often need extra attention in rainy climates and windy areas where water can be pushed sideways into the seam.
Overlap Measurements by Roof Pitch and Climate

Roof pitch changes the speed of water runoff. Climate changes the stress placed on the roof. Together, these factors help determine how much overlap is needed and how carefully each seam should be sealed.
Low Slope Roofs: Enhanced Overlap Requirements
Low slope metal roofs need more caution because water does not leave the roof as quickly. It can move slowly, collect near seams, or get pushed by wind across the surface. In those conditions, a short overlap becomes riskier.
That is why low slope roofs often need longer end laps, stronger sealant coverage, and tighter fastening patterns. In some cases, underlayment and ice and water protection become even more important. If the roof is close to flat, professional guidance is especially valuable because one small overlap mistake can lead to repeated leaks.
Medium to Steep Slope Roofs: Standard Overlap Specifications
Medium and steeper roofs usually allow water to run off more efficiently. That improves the natural water shedding performance of the metal panels. Even so, a steeper roof does not excuse poor workmanship.
The overlap still needs to follow manufacturer guidance, the sealant still needs to be continuous, and the screws still need correct placement. A steep roof may be more forgiving than a low slope roof, but it can still leak if the seams are not done correctly.
High Wind and Hurricane Prone Areas
Wind does more than lift panels. It can also drive rain into seams with surprising force. In coastal and storm exposed areas, overlap details become even more important because the roof has to resist both water intrusion and uplift pressure.
In these regions, installers may need closer fastener spacing, stronger sealants, and more attention to seam direction. Panels should be laid out with local weather patterns in mind so the overlap does not face the worst wind exposure. A roof in a calm inland area may not need the same detailing as one near the coast.
Side Lap vs. End Lap: Understanding the Difference
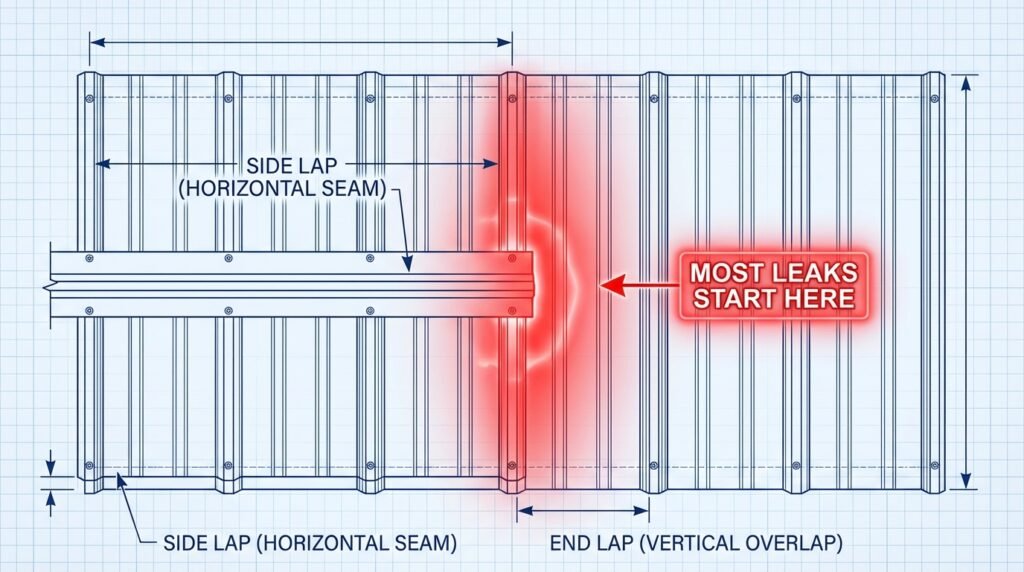
Many homeowners hear the word overlap and assume it means one thing. In reality, side lap and end lap serve different purposes and face different types of water exposure. Knowing the difference helps you understand where leaks are most likely to happen.
| Overlap Type | Location | Typical Distance | Water Flow Direction | Common Leak Causes |
|---|---|---|---|---|
| Side Lap | Where panels meet horizontally | One rib overlap minimum (corrugated) Mechanical interlock (standing seam) | Across the seam (sideways) | Missing sealant, loose fasteners, capillary action |
| End Lap | Where panel ends meet (eave to ridge) | 6-12 inches typical More for low-slope roofs | Directly over the seam (downward) | Insufficient overlap, poor support underneath, backwards installation |
What is a Side Lap?
Side lap is the overlap where one panel meets the next panel beside it. On ribbed panels, this is often where one rib covers part of another. On standing seam systems, it is the interlocking seam between neighboring panels.
This seam needs to stay tight and properly sealed so water does not move sideways into the roof system. Since side laps run a long distance from eave to ridge, consistency matters. One weak section can allow moisture to enter even if the rest of the seam looks fine.
What is an End Lap?
End lap is the overlap where the end of one panel covers the beginning of the next panel in the same row. These joints run perpendicular to the ridge and eave. Since water flows directly over end laps as it drains downward, these areas see more direct water contact than side laps.
End laps require strong support underneath, typically a solid deck or closely spaced purlins, to prevent movement that could break the seal. They also need proper overlap direction, with the upper panel always covering the lower one, so water continues moving downhill without reversing direction.
Sealant and Fastening Requirements for Each Type
Both side laps and end laps need sealant, but the placement and amount may vary. Side laps often use continuous butyl tape along the full length of the seam. End laps need careful sealant application across the entire width of the overlap to prevent water from finding a path through.
Fasteners must be placed correctly in both types of overlap. Side lap fasteners typically go through the raised rib or along the panel edge. End lap fasteners need to secure both the upper and lower panels firmly without over-tightening, which could crush the sealant or damage the washer.
Installation Best Practices for Metal Roof Overlaps
Even the best materials will fail if installation practices are careless. Proper overlap work requires attention to detail, manufacturer instructions, and experienced craftsmanship throughout the job.
Panel Layout Planning
Before any panels go up, plan the layout carefully. Consider where end laps will fall, how many full-length panels can be used, and where partial panels will be needed. End laps should be staggered across the roof rather than lining up in a single row, which creates a weak line across the entire surface.
Also think about weather exposure. In high-wind areas, orient the overlap so prevailing winds do not blow directly into the seam opening. This simple planning step can reduce water intrusion risk significantly.
Proper Sealant Application Techniques
Butyl tape should be applied to clean, dry surfaces before panels are joined. The tape must be continuous—no gaps, no skipped sections. When panels are fastened together, the compression should create a uniform seal along the entire length of the overlap.
Avoid over-compressing the sealant by using excessive fastener pressure. The goal is firm contact, not crushing the material. Similarly, loose fasteners leave gaps that allow water entry even when sealant is present.
Common Installation Mistakes to Avoid
- Installing panels backwards: Upper panel must always overlap lower panel in downslope direction
- Insufficient end lap distance: Cutting corners on overlap length to save material costs
- Skipping sealant: Assuming the panel overlap alone will stop water (it won’t)
- Poor fastener placement: Screws in wrong location, wrong spacing, or wrong torque
- No structural support: End laps placed over open space without adequate backing
- Misaligned panels: Crooked installation that creates uneven overlap widths
Diagnosing Metal Roof Overlap Leaks
Overlap leaks can be frustrating because the visible damage inside the home may not line up directly with the roof defect. Water travels along framing, insulation, and roof decking before it finally drips onto a ceiling or wall.
Common Signs of Overlap Leaks
One common sign is a ceiling stain that appears after rain, especially when the stain seems to line up with a roof seam. In attics, damp insulation or water marks on the underside of the roof can also point to seam leakage.
Some leaks show up only in certain weather. For example, a seam may stay dry during light rain but leak during storms with strong wind. That often suggests water is being forced into the overlap rather than simply falling through an open hole.
How to Locate the Exact Source of Overlap Leaks
A careful inspection usually starts inside the attic or roof cavity. Water marks can help trace the path backward toward the source. From there, the roof surface should be checked for gaps, failed sealant, rust spots, loose fasteners, and irregular seam alignment. Our comprehensive roof inspection checklist can guide you through this process.
End laps deserve extra attention because they are often the first place trouble begins. It is also important to check whether the upper panel overlaps the lower panel in the correct direction. If that basic detail is wrong, the seam can never shed water properly.
Causes of Metal Roof Overlap Leaks
Several problems can cause leaks at the overlap. The first is insufficient overlap distance. If the seam is too short, water has an easier path inside. The second is failed or missing sealant, which leaves the seam exposed to capillary action and wind-driven rain.
Fastener issues are also common. A screw that is too tight can damage the washer. A screw that is too loose can leave an opening. Movement from temperature changes can also weaken the seal over time, especially if the wrong products were used during installation.
How to Repair Leaking Metal Roof Overlaps
The right repair depends on the cause of the leak. Some overlap problems can be fixed with cleaning, resealing, and refastening. Others are serious enough that partial removal is the smarter long-term solution.
Safety First: When to Stay Off the Roof
Cleaning and Preparing the Overlap Area
Before any repair product is applied, the area should be cleaned well. Dirt, rust, old sealant, and moisture can prevent a proper bond. A new seal applied over a dirty seam is far less likely to last.
The metal should be dry and free of loose material before fresh sealant goes on. Good preparation often decides whether a repair holds or fails.
Re-Sealing Overlap Joints with Fresh Butyl Tape
If the overlap itself is sound and the main issue is worn-out sealant, fresh butyl tape may solve the problem. The goal is to restore the seal between the panels so water cannot travel through the seam.
This repair works best when the original overlap distance is adequate and the panels are still in good condition. If the seam is fundamentally wrong, new sealant alone may only provide temporary relief.
When to Remove and Reinstall Panels
Sometimes the only real fix is to remove the affected panels and reinstall them correctly. This is often the case when the overlap is too short, the end lap lacks support, or the panel layout itself is flawed.
While this takes more labor, it addresses the root problem instead of covering it up. In the long run, a proper reinstall may cost less than repeated small repairs that never fully solve the leak.
Tools, Materials, and Equipment for Perfect Overlaps
Good overlap work depends on both skill and materials. Even the best installer can struggle with poor quality fasteners or the wrong sealant. At the same time, premium products cannot make up for careless workmanship.
That is why a successful metal roof installation combines accurate measuring, clean cutting, proper sealing, and correct screw placement from start to finish.
Essential Tools for Metal Roof Installation
Common tools include measuring tools, chalk lines, drills, drivers, cutting tools, and seam tools for specific panel types. Safety gear is also essential, including gloves, eye protection, and proper fall protection.
The right tools help keep seams straight, overlap distances consistent, and fasteners properly installed. When installers try to improvise with the wrong equipment, seam quality often suffers.
Sealant Selection: Butyl Tape vs. Other Options
Butyl tape is a popular choice for overlap areas because it stays flexible and handles temperature changes well. It is designed to stay compressed between surfaces and create a dependable seal over time.
Other sealants may still have a role in certain exposed areas, but not every product is suitable for structural overlap seams. Using the wrong type of sealant can lead to early failure even if the roof looks fine right after installation.
Fastener Specifications for Overlap Areas
Fasteners need to match the panel system and be installed with the right pressure. If the washer is crushed, the seal can fail. If the screw is too loose, water can slip in around it. Placement matters just as much as tightness.
Overlap areas often need closer screw spacing than other parts of the roof. This helps hold the seam firmly and reduce movement that could weaken the seal later.
Need Professional Metal Roof Evaluation?
Get expert assessment of your metal roof overlaps and installation quality
Conclusion
Metal roof overlap may seem like a small installation detail, but it has a huge effect on roof performance. When side laps and end laps are done correctly, the roof can shed water properly, resist weather more effectively, and stay dependable for many years. When they are done poorly, leaks, rust, and structural damage can follow much sooner than expected.
If you are dealing with a leak, planning a new metal roof, or simply want to know whether your seams were installed correctly, RoofEval can help you take the next step with confidence. Reach out to RoofEval for a professional roof evaluation, expert guidance, and a clear understanding of whether your metal roof overlaps are protecting your home the way they should.
