
Key Takeaways
- Ceiling dampness is a warning sign because water has already entered hidden layers and damage is usually spreading behind the surface.
- The stain you see is often an exit point, so the real entry source can be far away due to sideways and upward moisture travel.
- Dampness, leakage, and condensation look similar but need different fixes, so misdiagnosis is the fastest way to waste money.
- Repainting and simple crack filling fail because they trap moisture and never stop water at the entry point.
- Permanent repair requires root cause tracing, correct waterproofing or plumbing correction, proper curing, and final testing to prevent repeat seepage.
Introduction
A damp patch on the ceiling is not just an ugly mark you cover with paint. It is your home sending you a warning sign. By the time moisture shows on the surface, water has already been sitting inside layers you cannot see, softening plaster, weakening edges, and quietly expanding the damage like a slow spill that never dries.
The dangerous part is how innocent it looks at first. One small stain becomes a larger ring, the ceiling starts to feel a little rough, and then you notice the smell, the peeling, or the hairline cracks that were not there before.
If you treat it like a cosmetic problem, it almost always comes back, usually bigger and more expensive. Keep reading to understand what ceiling dampness really means, how to trace the true source, and what permanent fixes actually stop it for good.

Understanding Ceiling Dampness: What’s Actually Going Wrong
Ceiling dampness means moisture is entering from somewhere and then migrating through materials like concrete, plaster, or insulation, which is why the mark you see is often only the final “exit point” of a bigger hidden problem.
The entry point could be the roof surface, a crack in the slab, failed waterproofing under tiles, or a leaking pipe, but people often misread what they are seeing because dampness, leakage, and condensation can look similar at first glance.
The difference matters because they behave differently: dampness is usually slow seepage through building layers, leakage is a more direct water escape that may drip or spread quickly, and condensation is surface moisture caused by trapped humidity and poor ventilation.
To make it trickier, moisture does not always travel straight down, it can move upward and sideways through porous surfaces by capillary action, so the stain may appear far from the real source. That is exactly why proper tracing is more important than repainting, because cleaning the ceiling without finding the entry point only hides the warning while the damage continues behind it.
Common Causes of Ceiling Dampness (Ranked by Severity)
Most ceiling dampness comes from a small set of repeat causes. The list below is ranked by how quickly it can turn into serious damage if ignored.
- Roof slab cracks and failed waterproofing
- Leaking overhead tanks and plumbing lines
- Bathroom seepage from upper floors
- Poor drainage slopes and stagnant water accumulation
- Condensation due to ventilation failure

How to Identify the Exact Source of Seepage
National Association of REALTORS® warns that water stains on walls or ceilings can mean mold may be present beneath surfaces, especially when stains are older. Start with timing and simple checks. Use tools if the pattern is unclear.
- Moisture meter readings to map wet and dry zones
- Infrared scanning to spot cooler damp areas
- Dye testing in bathrooms to confirm slow drain leaks
- Pressure testing for plumbing lines when leaks are hidden
DIY approach is fine when the source is obvious, fixed, and the area dries fully. Call a professional if the stain returns, spreads, or sits near electrical fixtures.
Short Term Fixes That Don’t Work (And Why They Keep Failing)
Quick fixes keep failing because they only treat what you can see on the ceiling, not where the water is actually entering. In many cases, they make things worse by trapping moisture inside the slab or plaster, so the ceiling stays damp for longer, the material becomes weaker, and the stain spreads or reappears in a new spot.
The most common traps are:
- Repainting without fixing the source
- Coating the inside ceiling surface
- Filling cracks without proper crack treatment from the top side
- Using temporary sealants that eventually peel once moisture pressure builds behind them
These solutions may look fine for a few weeks, but the water keeps moving in the background, which is why the dampness almost always returns.

Permanent Seepage Solutions for Ceiling Dampness
Permanent repair means stopping water where it enters, then restoring the ceiling after everything is dry. The right solution depends on the source.
- Roof waterproofing with proper prep, crack treatment, and drainage correction
- Crack injection or membrane systems where water travels through concrete
- Bathroom waterproofing rebuild under tiles with correct drain detailing
- Plumbing repair with testing and joint replacement, not patchwork
Step by Step: How Professionals Permanently Stop Ceiling Seepage
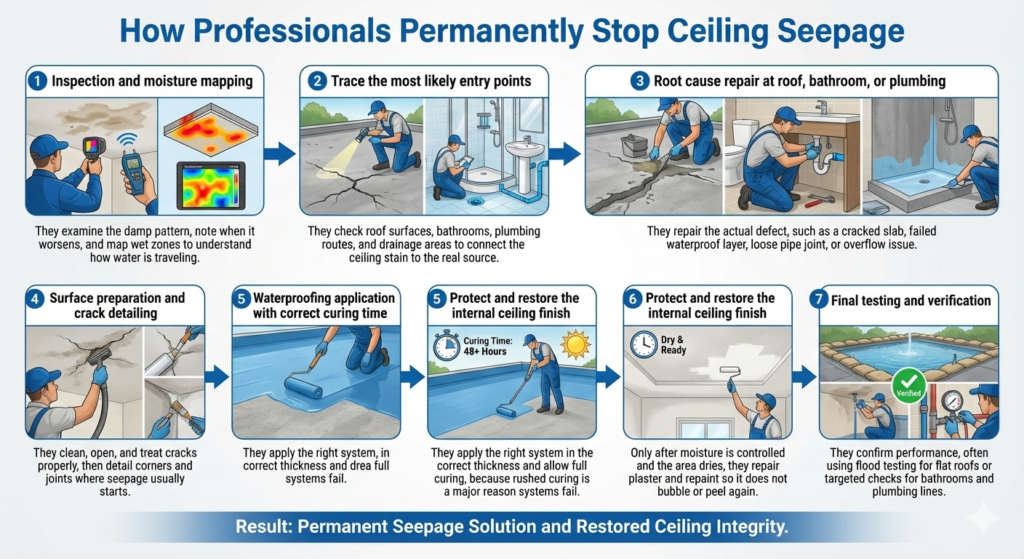
Professionals stop ceiling seepage by following a clear process that finds the true entry point and fixes it, instead of covering stains and hoping for the best. The goal is simple: remove the cause, rebuild the protection, and then confirm it works with testing.
Step 1: Inspection and moisture mapping
They examine the damp pattern, note when it worsens, and map wet zones to understand how water is traveling.
Step 2: Trace the most likely entry points
They check roof surfaces, bathrooms, plumbing routes, and drainage areas to connect the ceiling stain to the real source.
Step 3: Root cause repair at roof, bathroom, or plumbing
They repair the actual defect, such as a cracked slab, failed waterproof layer, loose pipe joint, or overflow issue.
Step 4: Surface preparation and crack detailing
They clean, open, and treat cracks properly, then detail corners and joints where seepage usually starts.
Step 5: Waterproofing application with correct curing time
They apply the right system in the correct thickness and allow full curing, because rushed curing is a major reason systems fail.
Step 6: Protect and restore the internal ceiling finish
Only after moisture is controlled and the area dries, they repair plaster and repaint so it does not bubble or peel again.
Step 7: Final testing and verification
They confirm performance, often using flood testing for flat roofs or targeted checks for bathrooms and plumbing lines.
Waterproofing Materials Explained (What to Use and What to Avoid)
Different materials suit different problems, so product choice should follow diagnosis. Avoid any solution that only coats the ceiling from inside, it is the wrong side of the water path.
- Polyurethane coatings: flexible, good water resistance
- Acrylic coatings: easier to apply, but weaker under standing water
- Cementitious systems: bond well to masonry, can be less flexible
- Sheet membranes: durable barrier if seams are perfect
- Liquid applied membranes: great for corners if thickness and curing are controlled
Cost Breakdown: What Permanent Seepage Repair Actually Costs
Costs vary by access, area, and how much hidden damage exists. But surface fixes repeat, while root cause repairs usually save money over time.
| Repair Type | Estimated Cost Range |
|---|---|
| Minor localized seepage repair | 300 to 1,200 |
| Plumbing leak diagnosis & repair (Includes patch restoration) | 250 to 2,500 |
| Bathroom seepage repair (With proper waterproofing) | 1,500 to 8,000 |
| Full flat roof waterproofing system | 3,000 to 15,000+ |
How Long Permanent Seepage Solutions Really Last
Lifespan depends on prep, detailing, drainage, and curing. Even good systems fail early if water keeps pooling or cracks are left untreated. US EPA emphasizes that moisture control is key to mold control and that damp or wet surfaces should be dried promptly while fixing the source of the water problem.
In practical roof terms, “moisture control” starts with how quickly you get water off the surface and stop it from re entering.
- Keep roof drains and downpipes clear so rainwater exits fast instead of backing up.
- After any rain, watch for ponding areas that stay wet longer than 48 hours because standing water speeds up waterproofing failure.
- Also reseal small gaps around penetrations like vent pipes, AC lines, and parapet joints, because tiny openings are exactly where seepage usually starts and then spreads invisibly.
Preventing Ceiling Dampness Before It Starts
Prevention is mostly water management and ventilation. If water leaves the roof quickly and humidity leaves the room quickly, ceilings stay dry longer. Use this annual checklist:
- Inspect roof surfaces for cracks and open joints
- Confirm drainage clears water quickly after rain
- Ventilate bathrooms and repair grout gaps early
- Fix small drips before they become hidden leaks
When to Call a Seepage Specialist (And When Not To)
Some ceiling stains can wait a little if they are old, dry, and clearly linked to a one time issue that has already been fixed. But you should not delay when safety or structure might be involved, because water can weaken plaster and concrete over time, damage wiring, and create conditions where mold spreads behind the surface without being obvious.
Call a seepage specialist if: the ceiling feels soft or sagging, if you see active dripping or fast spreading stains, if the damp area is near electrical fixtures, or if there is a musty smell or visible mold specks.
DIY is only acceptable when the source is clearly confirmed and properly fixed and the area dries fully with no return of staining. When you hire someone, choose a contractor who diagnoses before quoting, explains the root cause, and provides a written scope and warranty instead of vague promises.
Conclusion
Ceiling dampness is a serious warning because it means water is entering materials that are meant to stay dry, and once moisture gets inside, it keeps weakening plaster and concrete even if the stain looks small. Fixing the entry point is what breaks the cycle, so you avoid repeat patch repairs, reduce wiring risks, and stop the damp conditions that allow mold and musty smells to develop.
Stop the Seepage Before It Spreads
If you want a clear diagnosis without guesswork, book a professional inspection to pinpoint the source and get a repair plan that actually lasts.
